 Have you ever had problems with not being able to access a website, load information, or view documents through your browser? Any problem that hinders your ability to get work done can be a pain. In the second part of this two part article I am going to explain how to harden your security setting in Internet Explorer.
In the past Microsoft has talked about the vulnerabilities in different versions of Internet Explorer (IE). However it is easy to protect IE from these types of actions. IE can be a very secure browser if you make it that way. Let’s discuss how you would go about doing that.
First you need to determine which version of IE you are running. To do that open your IE browser. Click on the either the Help icon on the top of your browser or look for the gear in the upper right hand corner of your browser and click it. Scroll down to the About Internet Explorer tab and click it. This will display what version of IE you are running. For this how-to I will be using IE 11 which is the latest version released to date. On the latest version there will be a box that says Install new versions automatically. On older version this was not there and caused a lot of problems for users who did not have their own IT department. A lot of users would be running older versions of IE which had a lot of security holes in them. If you keep this box checked you get the latest versions out. This is not a new feature. Other browsers like Google Chrome and Mozilla Firefox have had the same feature for years.
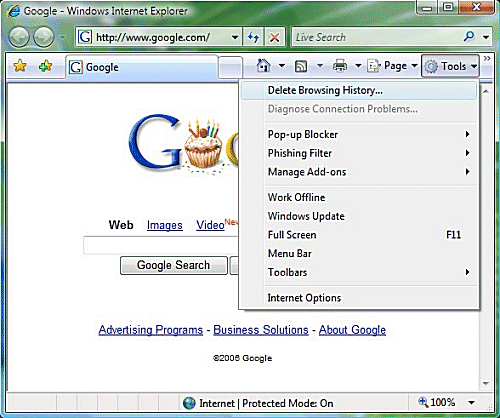
Now I’m go discuss how to harden your security settings. To access this, click on the gear in the upper right hand corner and click it. Scroll down to Internet Options and click it. If you were able to read the first article you know that this is the “under the hood” settings for IE. This is where all of the changes will be made to IE.
Now that you are in Internet Options click on the Advanced tab which is the last tab on the right. Scroll down to the Security section which will have a padlock next to it. Next you need to scroll down to a box labeled Enable Enhanced Protected Mode. Enhanced Protected Mode allows you to use your browser without allowing any other sites to request access to your computer, download anything without your permission, or anything else with malicious code.
The next box you are going to want to check is Enable SmartScreen Filter. SmartScreen Filter is a feature that helps detect phishing websites. It can also help protect you from downloading or installing malware and other malicious software. AS you browse the web it analyses webpages and determines if they have any characteristics that might be suspicious. If it finds suspicious webpages it will display a message giving you an opportunity to provide feedback and advising you to proceed with caution.
The last thing I am going to discuss is the Security tab under Internet Options. This tab is the second tab from the left. Within this tab you will see a section that says Security level for this zone and underneath it has a sliding bar. This bar allows you to set the security level you want to operate on. For most of us Medium-high is sufficient. However if you want to change this setting. Scroll the bar up and it will change to High. Under the High setting, any website that requires you to run script this setting is going to protect you from and prompt you to see if you want to use the site. This will give you the highest level of internet security through your browser. If you change this setting it is also recommended that you change it under the Local intranet setting which is listed above under the Security tab. You should know that if you make this change and you want to go to a banking website or any ecommerce website they are most likely going to fail because you have restricted the access so much that the site isn’t able to use its security setting you verify you. If you want to keep these setting High but allow access to specific websites you can click on the Trusted sites icon and add those sites to the list. Click the Sites tab and under Add this website to the zone, type in the URL.
When making the decision to raise your security setting to High it is best to consult with your IT department first. Could you be raising the security too high and limit your ability to access sites that you use on a daily basis slowing down work production.